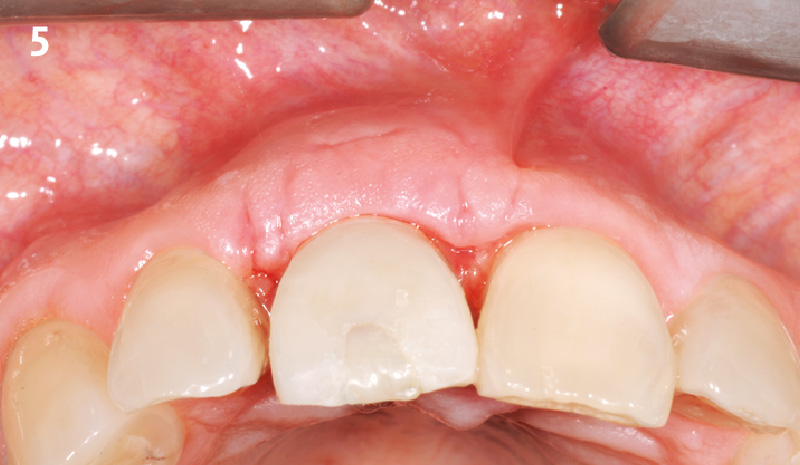
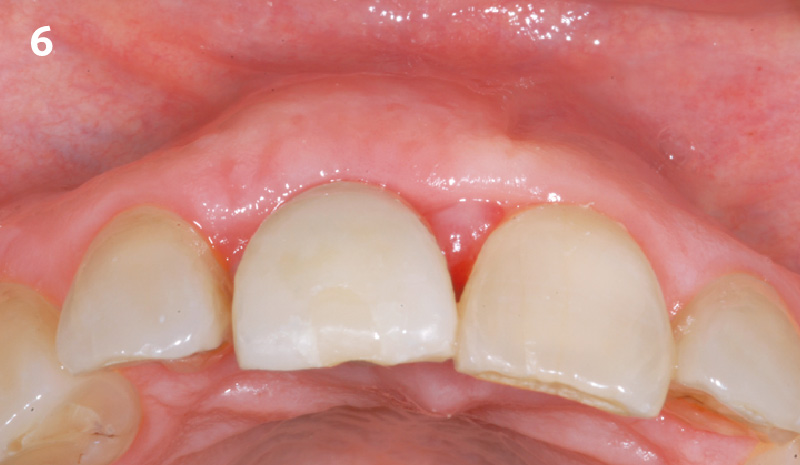
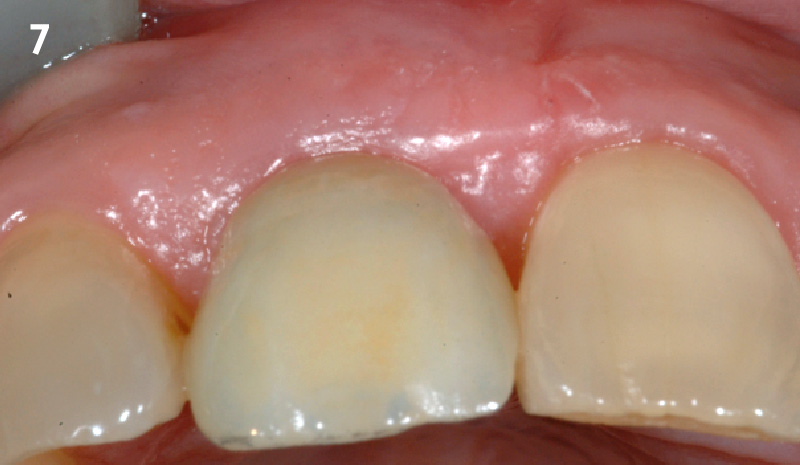
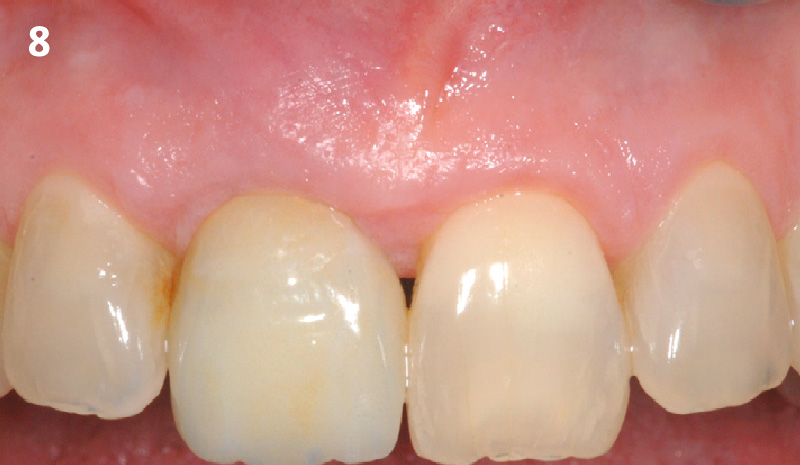
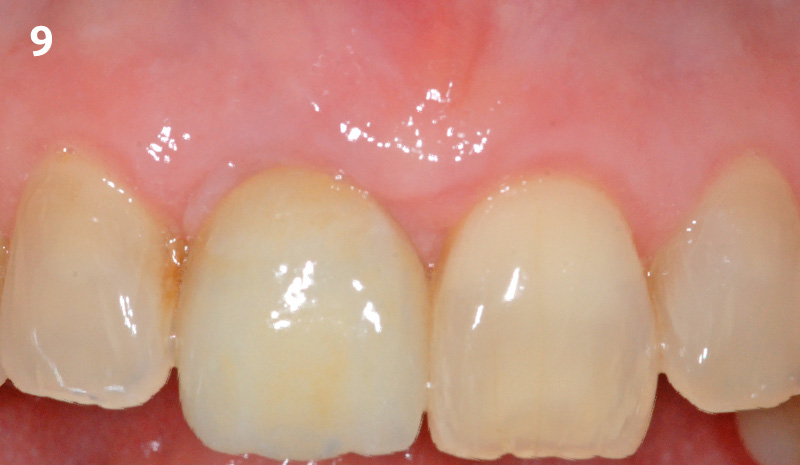
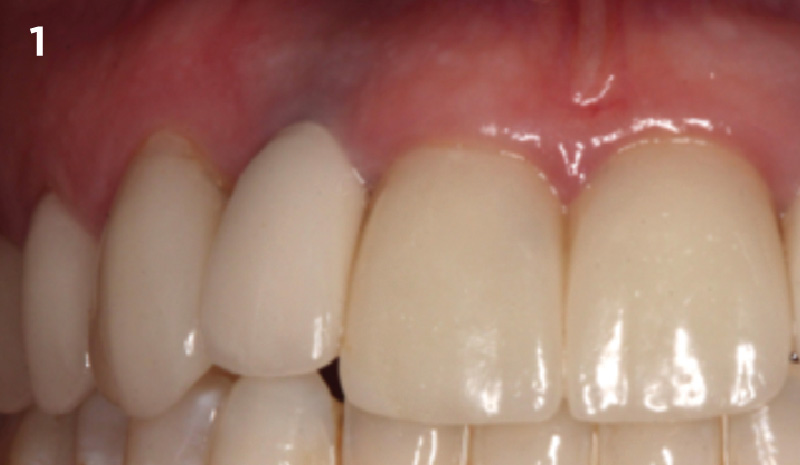
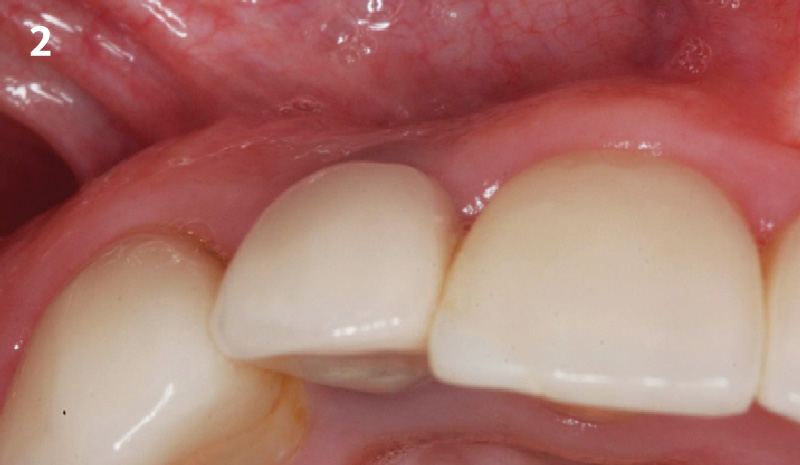
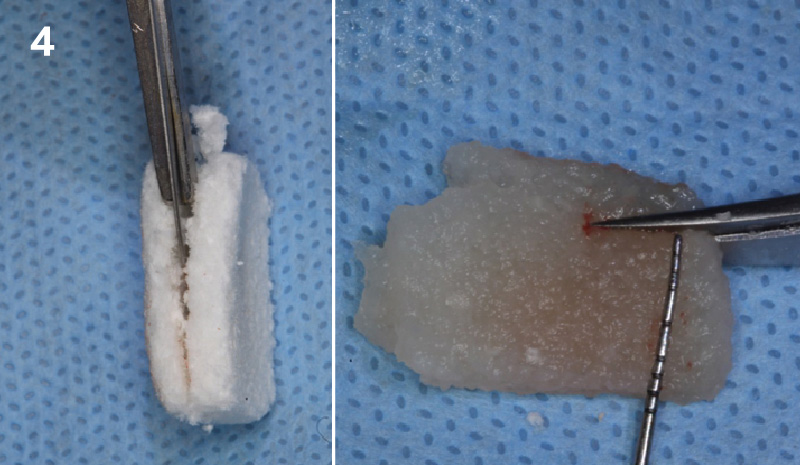
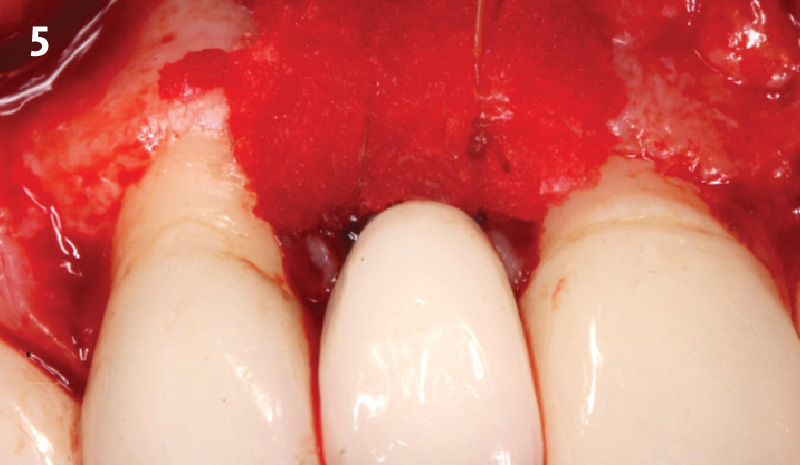
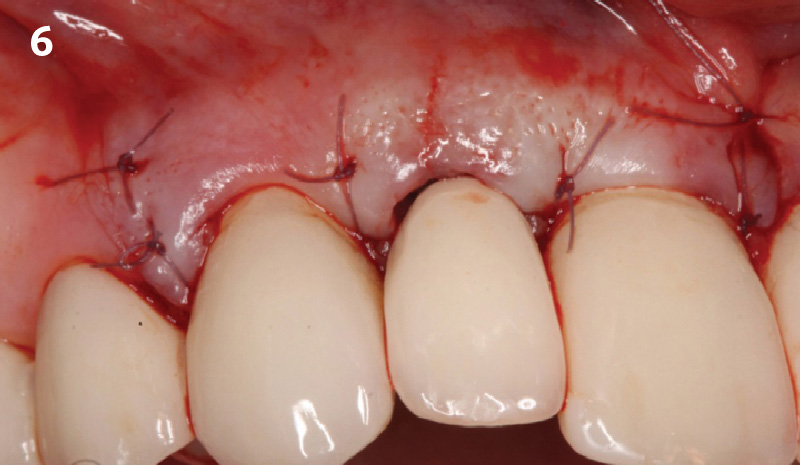
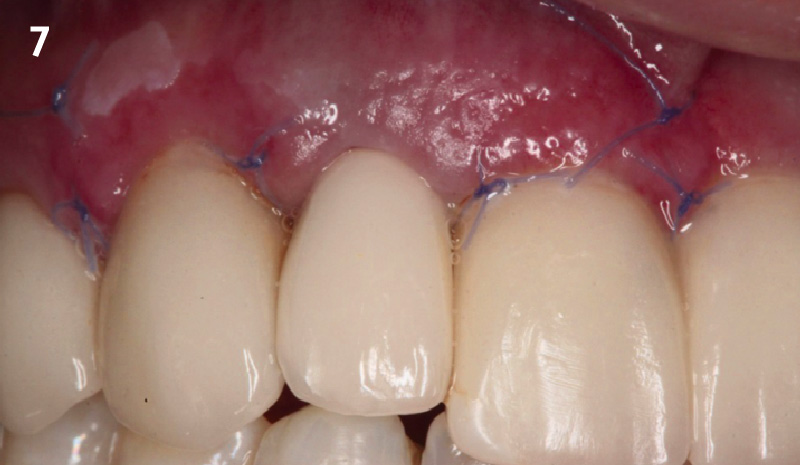
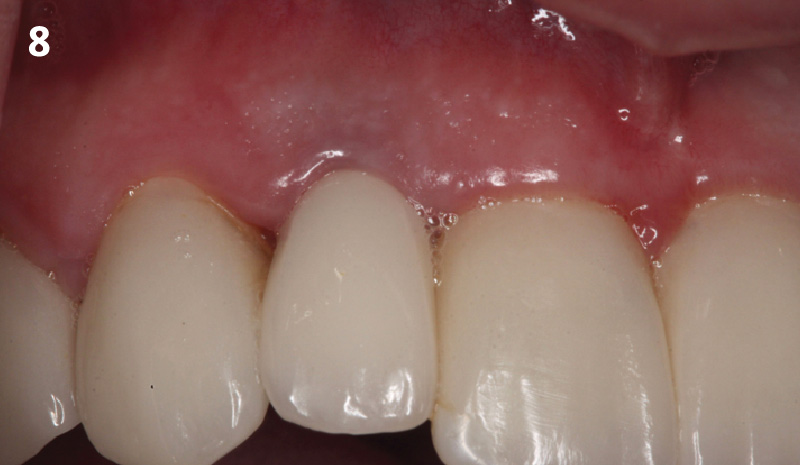
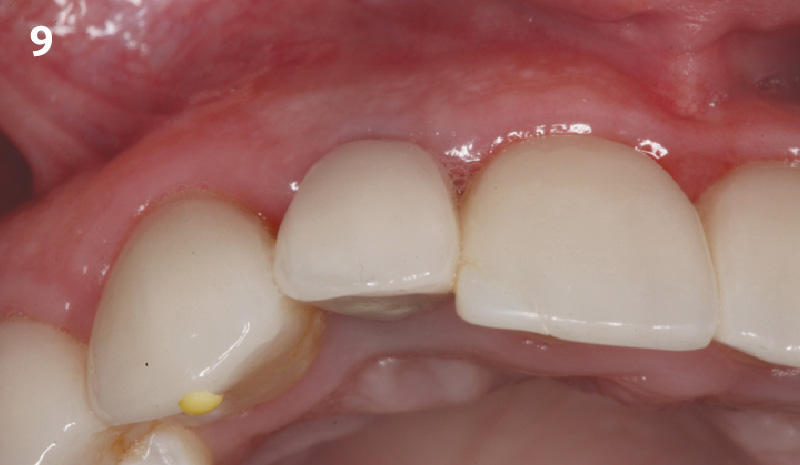
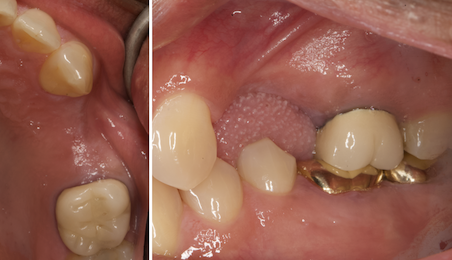
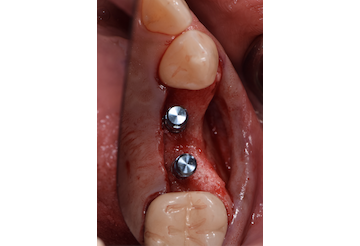
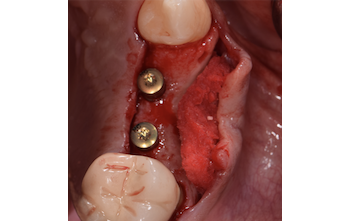
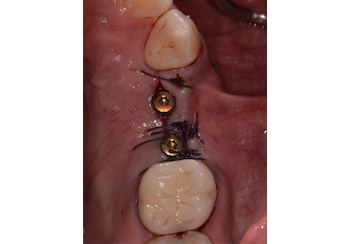
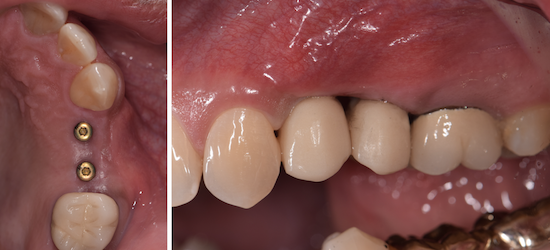
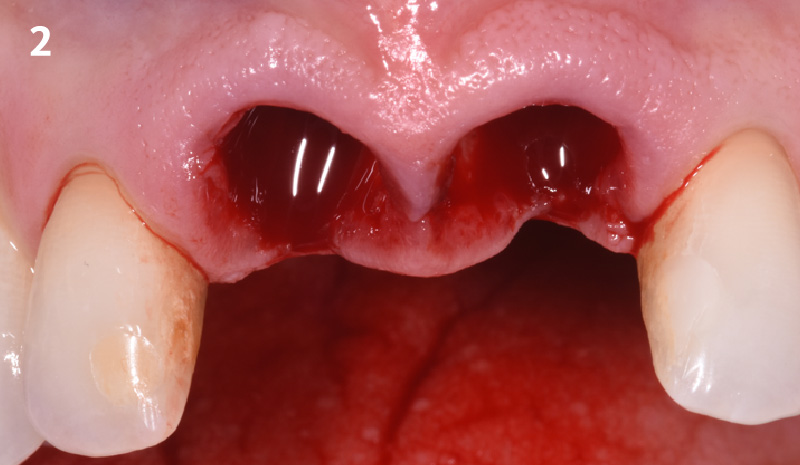
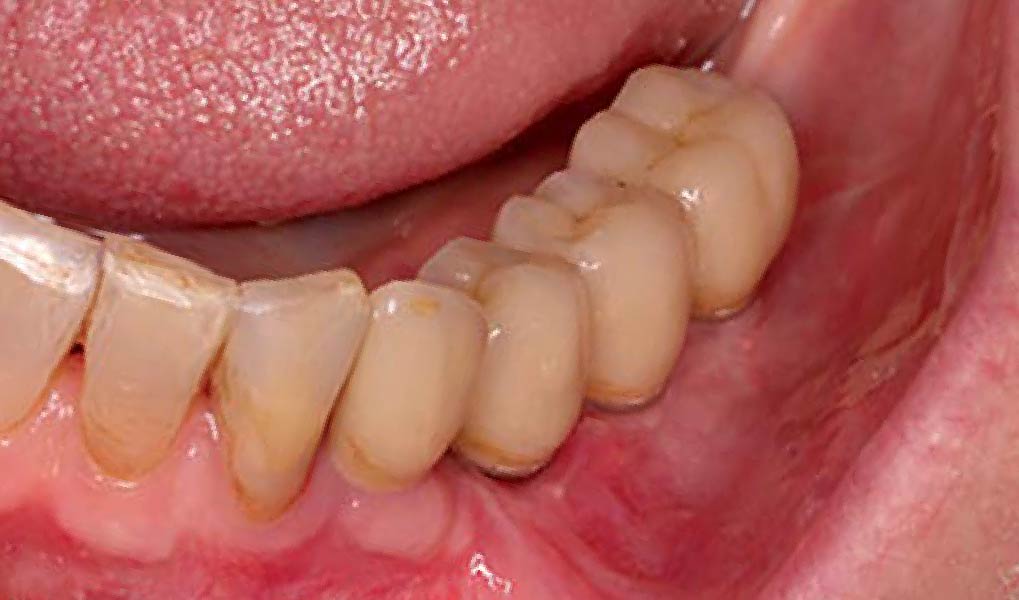
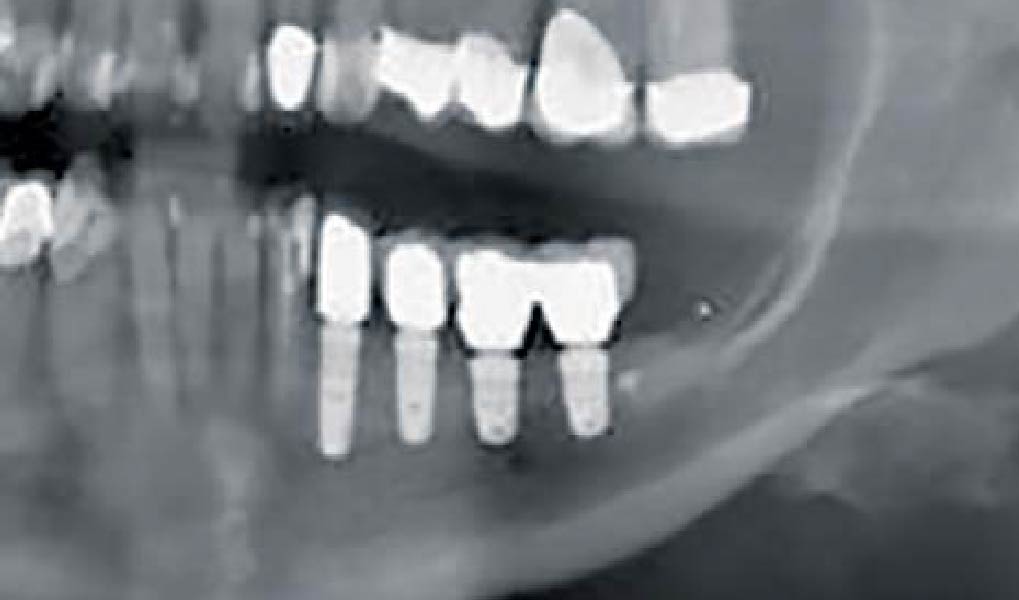
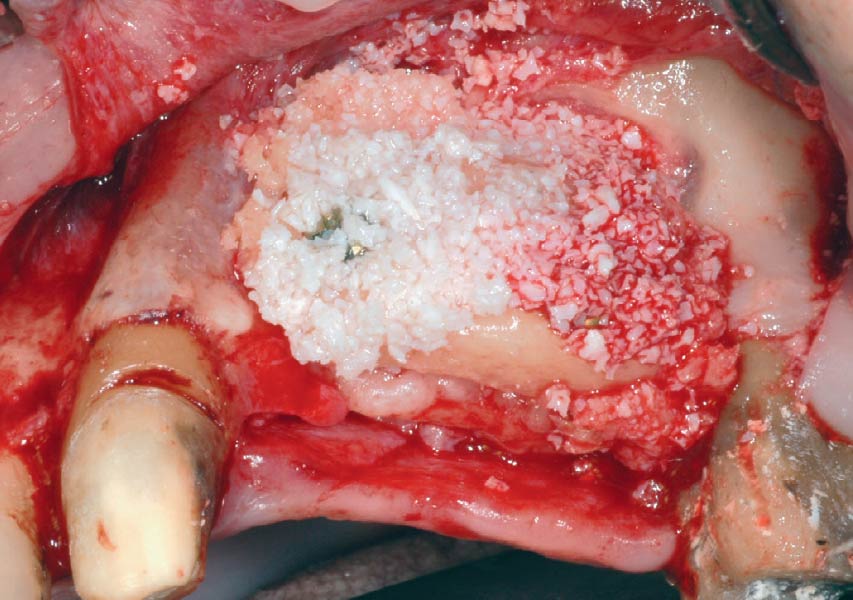
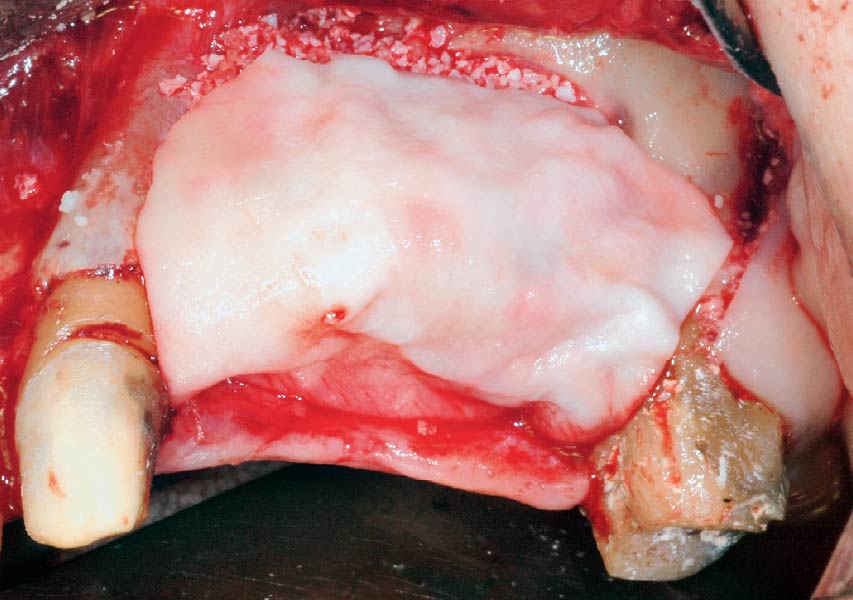
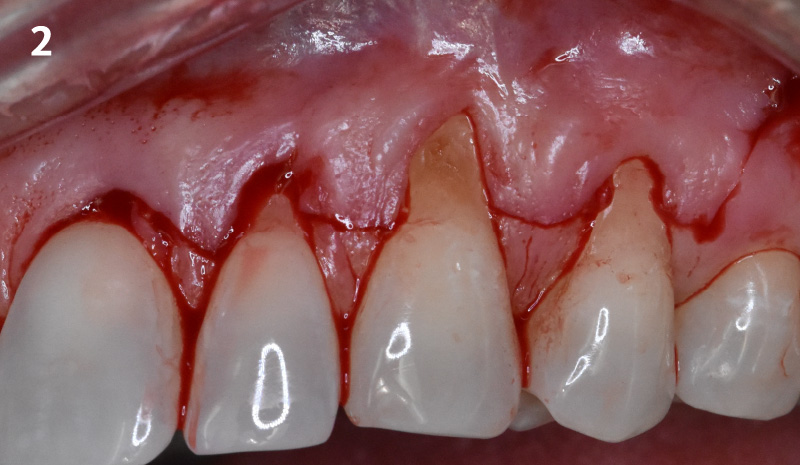
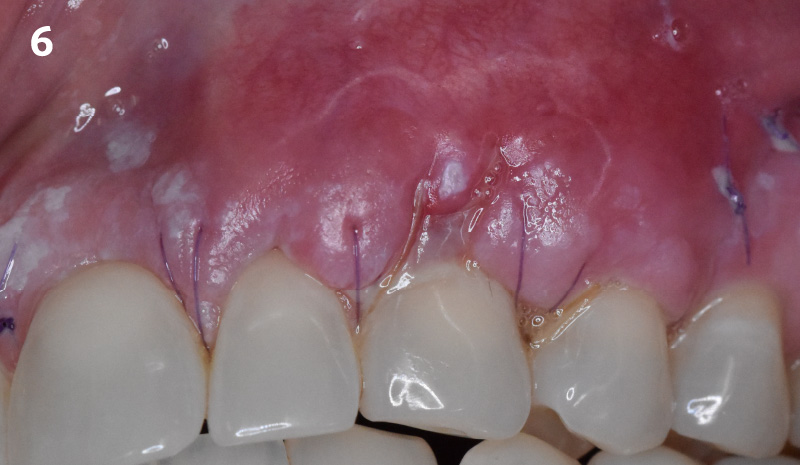
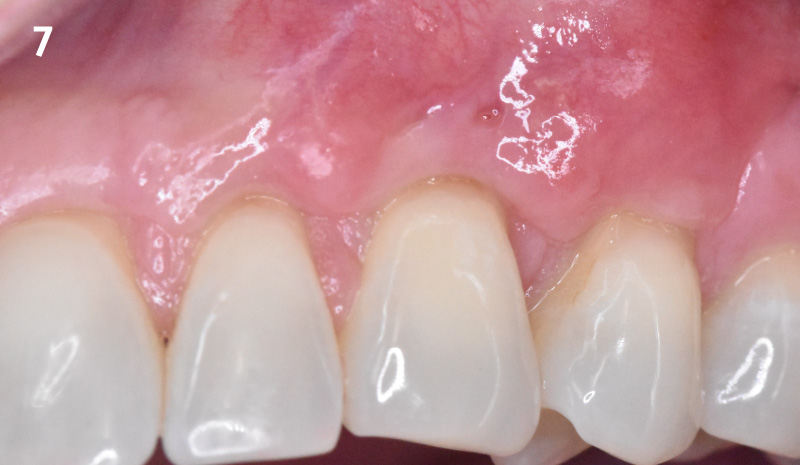
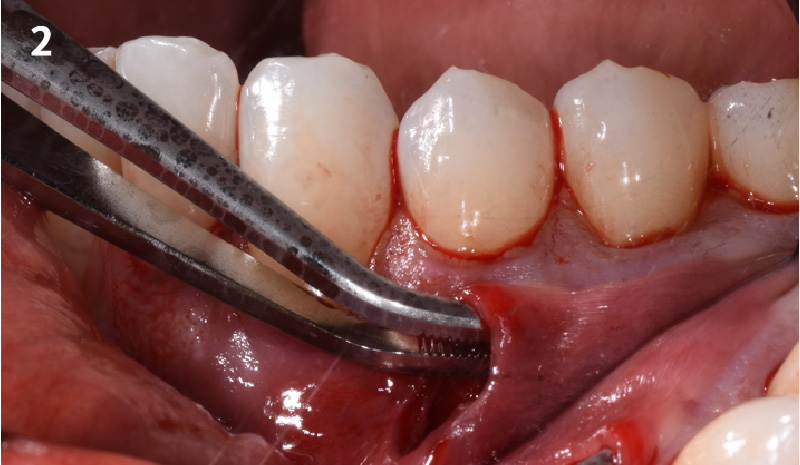
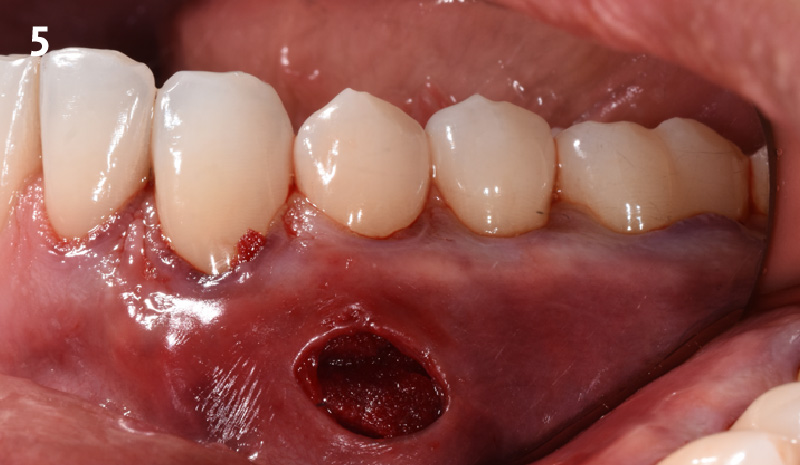
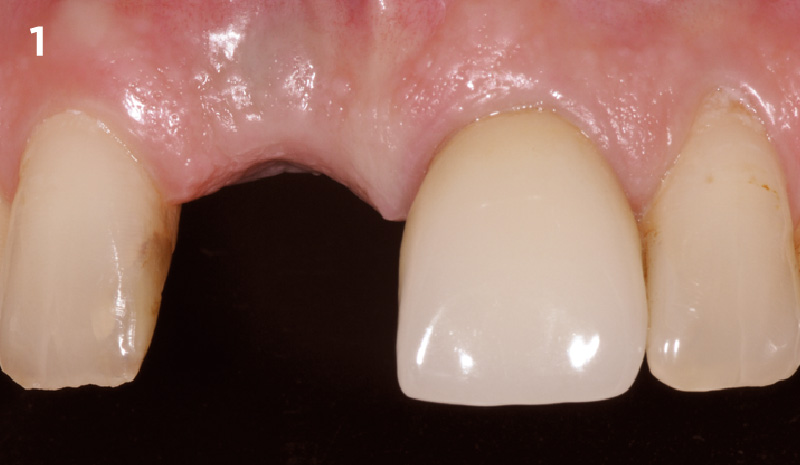
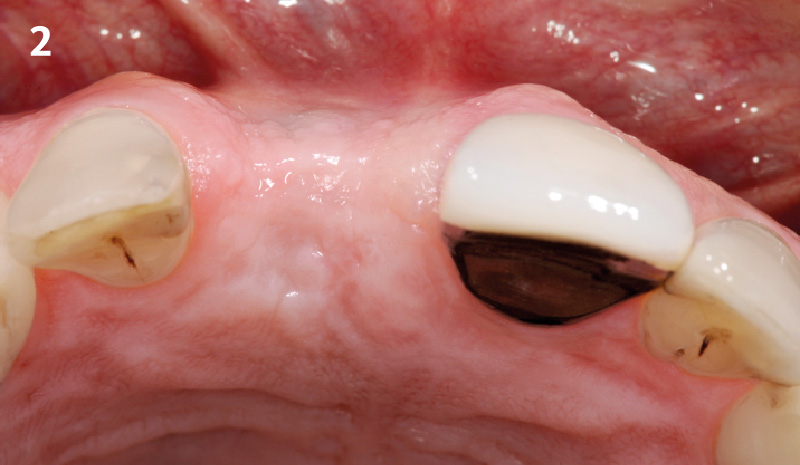
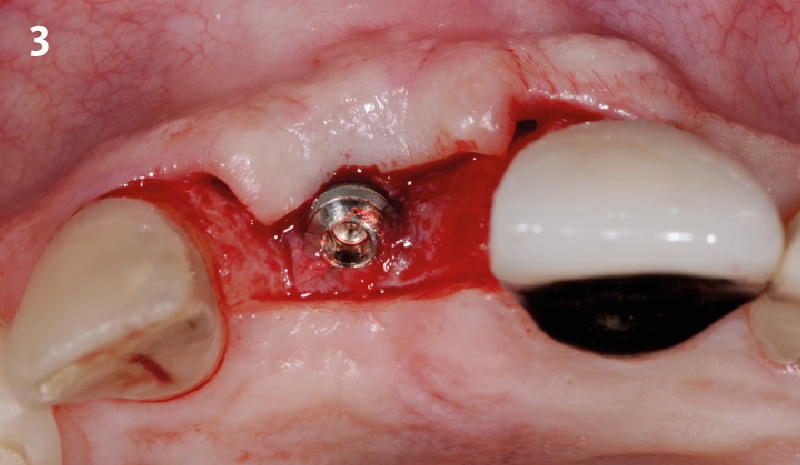
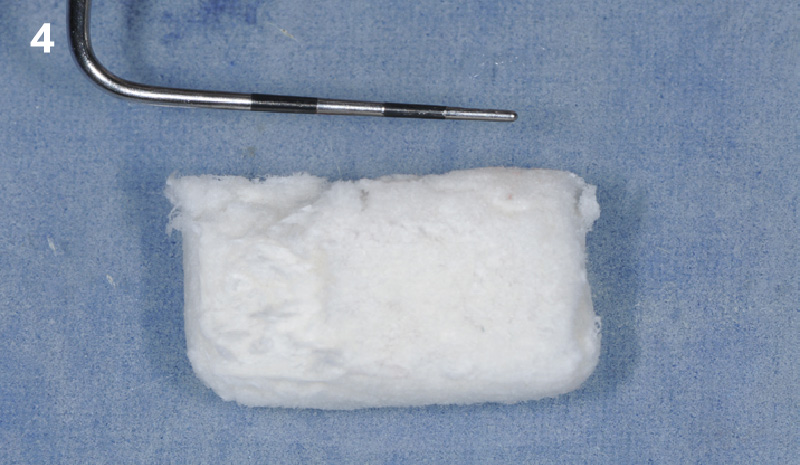
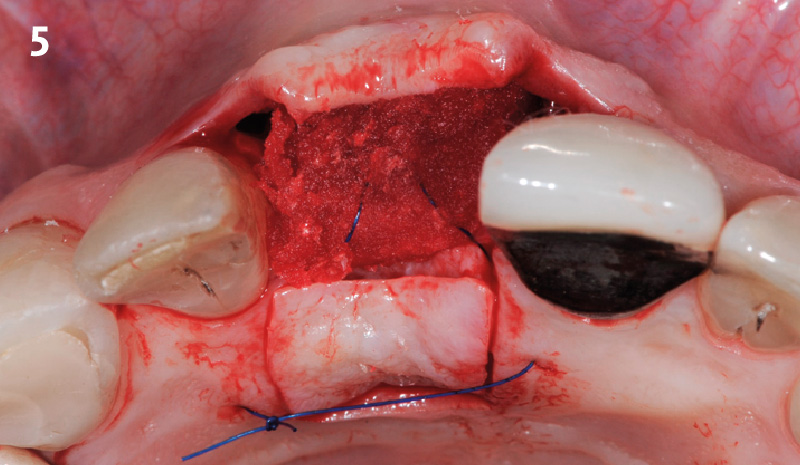
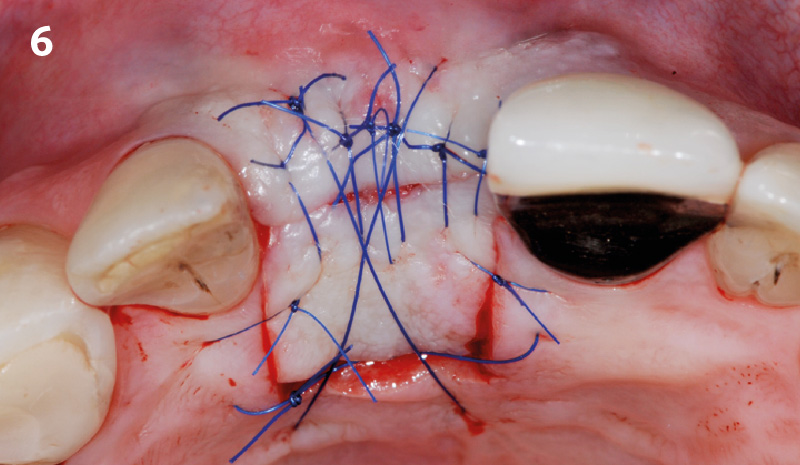
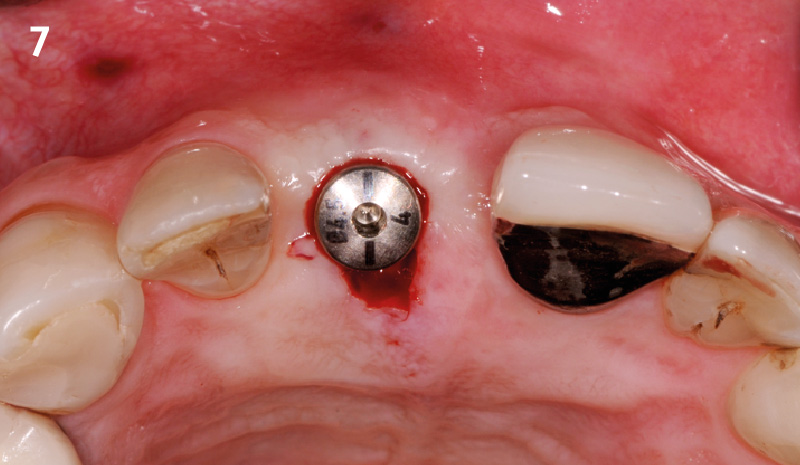
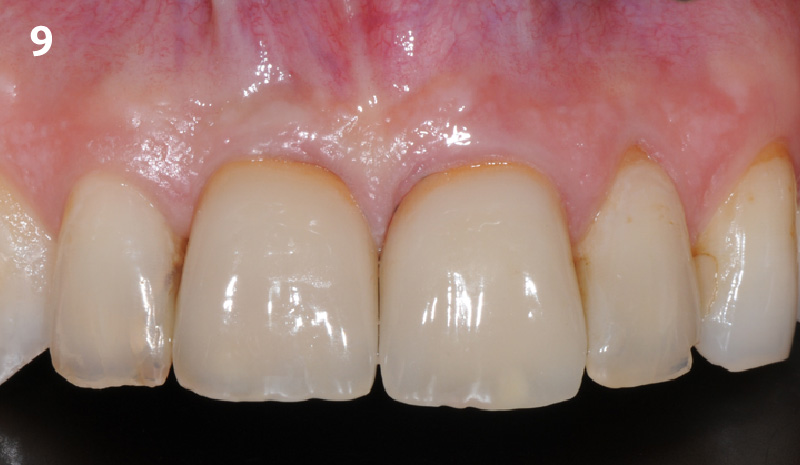
Mix & Match! Buy ANY 10 Biomaterial Products, Get 3 Free! Use code Q2BG10Learn More
GEM 21S®, the first recombinant growth factor product for use in oral regenerative surgery. Learn More
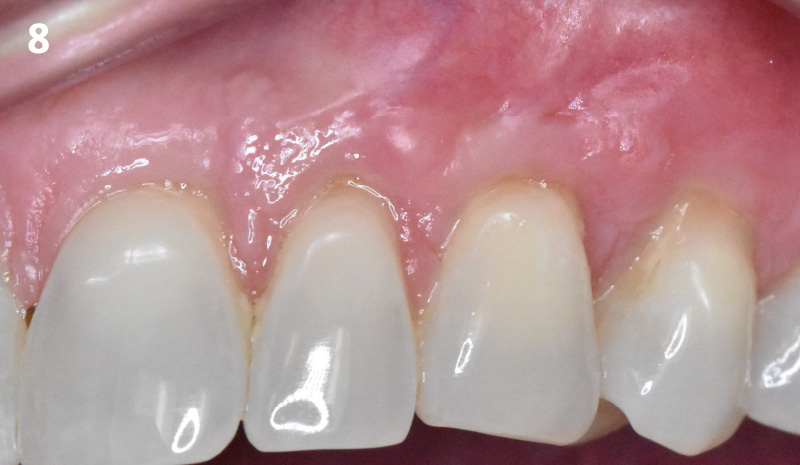
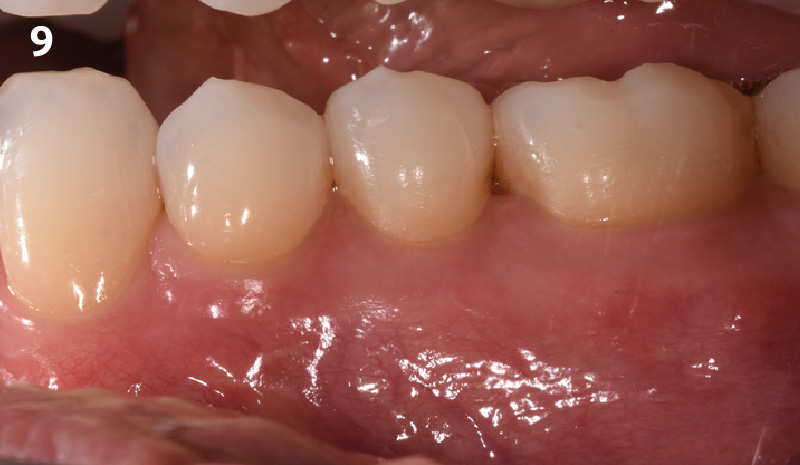
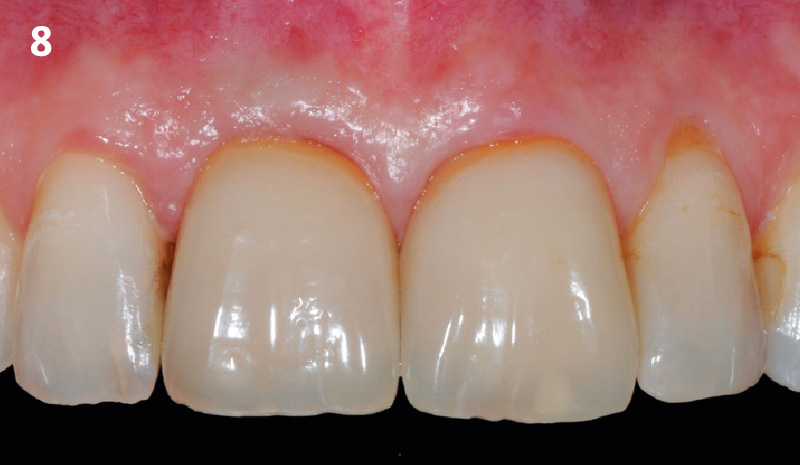
Category: Uncategorized
CLINICAL CASE
1 – The preoperative radiograph displays the vertical bone defect in the left mandible and thus, insufficient vertical bone volume to allow implant placement. 2 – Yxoss CBR® is planned based on the preoperative CBCT data. 3 – Opening the defect site using the ridge incision technique. The titanium scaffold fits the bone defect precisely during the augmentation procedure. 4 – The titanium scaffold is filled with 50% autologous bone and 50% Geistlich Bio-Oss®. Fixation is performed with one titanium screw in vestibulolingual direction. 5 – A collagen membrane (Geistlich Bio-Gide®) is used to provide an additional barrier for bone regeneration. 6 – Stable soft tissue situation after 6 months with no complications during the healing period. After reopening, bone is regenerated to the contour defined by the titanium scaffold. 7 – The bone is completely regenerated in the correct three-dimensional orientation. This is also visible in the respective CBCT. Implant placement is now possible. 8 – Two implants were placed with good primary stability. The vertical bone regeneration is also visible in the CBCT data. 9 – Postoperative panoramic radiograph after implant placement. 10 – Clinical situation 3 months post implant insertion.11 – Final prosthetic reconstruction 6 months post implant insertion and 16 months post regenerative surgery. 12 – Final prosthetic reconstruction 16 months post regenerative surgery.
CLINICAL CASE
1 – Pre-operative assessment demonstrating significant bone loss, prior to vertical ridge augmentation. 2 – Labial view of the posterior mandibular defect site. Cortical bone was perforated to increase the blood supply. 3 – RPM™ was secured on the lingual side prior to applying a 1:1 mixture of autogenous bone and Geistlich Bio-Oss®. 4 – RPM™ was secured over the bone graft with titanium pins and screws.5 – Geistlich Bio-Gide® is placed on top of RPM™ to prevent early soft tissue ingrowth while allowing for graft vascularization. 6 – Labial view of the soft tissue 9 months after the vertical bone augmentation.7 – RPM™ exposed at 9 months, following flap elevation. 8 – Labial view of the regenerated surgical site at 9 months demonstrates well vascularized bone.9 – Occlusal view of the regenerated surgical site at 9 months demonstrates well vascularized bone.10 – Implant placement in the newly regenerated bone. Geistlich Fibro-Gide® (15x20x6mm) was placed on top of two implants, to increase soft tissue thickness.12 – Periapical x-ray 1 year post-operatively, demonstrates implant stability and mature bone formation following vertical bone augmentation and soft tissue thickening.
CLINICAL CASE
Initial situation, patient presented with radiographic and clinically traditional signs of peri-implantitis, including bleeding on probing, suppuration, radiographic progressive bone loss and clinical pathologic probing depths. Mechanical debridement was achieved using titanium scalers, an ultrasonic device with an implant protective cap and titanium brushes to remove all of the visible contaminants of the implant surface. Citric acid was then placed on shreds of a non-woven gauze and applied to the surface for approx. 1min. Copious irrigation was done using saline solution and the surface was ablated using the Er:YAG laser at 20pps/50mj. After the surface was prepped and no signs of residual granulation tissue was noted, the defect was grafted with Geistlich Bio-Oss®. Attention was given towards not augmenting beyond the bony envelope. A protective Geistlich Bio-Gide® membrane was placed over Geistlich Bio-Oss®.Geistlich Fibro-Gide® was placed over Geistlich Bio-Gide® to enhance soft-tissue volume and quality. Geistlich Fibro-Gide® was trimmed and adapted to the defect site ensuring a tension free closure. Geistlich Fibro-Gide® was place on the top of the bone graft to enhance soft-tissue thickness. Geistlich Fibro-Gide® is porous. We can observe the rapid penetration of blood through the matrix. Closure with a tension-free flap was achieved by releasing incisions and secured using 4-0 chromic gut sutures.1.5 year post-operative photo and radiograph show the healing of the soft-tissues with no signs of peri-implantitis and adequate tissue thickening. Radiographic bone levels have maintained stable over the course of the year.
CLINICAL CASE
Pre-operative condition: Note that the gingival recession of 3-4 mm is evident as is the cervical root abrasions. The interdental papillae completely fills the embrasure space. Incision design showing the sulcular incisions with horizontal incisions across the interdental regions ending with a remote oblique vertical releasing incision distal to the first bicuspid tooth.Geistlich Fibro-Gide® is trimmed in a dry state to 10 x 15 x 6mm. The corners were trimmed for better adaptation and the matrix was then hydrated in sterile saline solution.The interdental papillae were de-epithelialized and Geistlich Fibro-Gide®was placed over the exposed roots extending onto the bone. Geistlich Fibro-Gide® was not secured with sutures. Internal periosteal releasing incision was made to allow tension-free coronal advancement of the buccal flap to completely cover Geistlich Fibro-Gide®.The flap was secured with 5-0 Monocryl® sutures. 1-week post-operative visit: the healing looks good and sutures are intact. There was a small soft-tissue dehiscence at the buccal margin of the canine tooth. Healing progressed well at 2 months post-operatively and the dehiscence defect seen at 1 week appears to be healing. Soft-tissue thickness is also evident at this stage. At 6 months, 100% root coverage has been achieved. Note the increase in keratinized gingiva at the canine tooth where there was previously delayed healing. The patient is happy with the esthetic and functional outcome.
CLINICAL CASE
1 – Baseline: recession defects on teeth #19 to #22 in the lower left quadrant. Exposed root surfaces of these teeth were thoroughly scaled and root planed before surgery. 2 – A full thickness muco-gingival tunnel was prepared through a minimally-invasive vestibular access incision apical to the teeth with gingival recessions.3 – Geistlich Fibro-Gide® was cut into small pieces in a dry state using a scalpel. 4 – Insertion of Geistlich Fibro-Gide® into the subperiosteal tunnel. 5 – Geistlich Fibro-Gide® in situ: the gingival margin had been coronally advanced and stabilized after pieces of Geistlich Fibro-Gide® were placed. 6 – 1 week post-surgery: anchoring sutures were left in place for 1-2 weeks. 7 – 2 weeks post-surgery: anchoring sutures in place. 8 – 2 weeks post-surgery: removal of anchoring sutures. 9 – 7 months post-surgery: complete recession coverage.
CLINICAL CASE
1 – Baseline frontal view: missing central incisor. Implant visible through mucosa due to thin biotype.2 – Baseline occlusal view: soft-tissue deficit in the buccal and occlusal area. 3 – Flap elevation on the buccal side using a full flap crestally and a split flap buccally.4 – Adaption of Geistlich Fibro-Gide® to the defect size. 5 – Palatal island flap prepared to allow for tension-free wound closure. Geistlich Fibro-Gide® in situ, immobilized with a mattress suture.6 – Tension-free wound closure using single interrupted sutures (Dafilon 5-0, Braun).7 – Abutment connection. 8 – 6 months follow-up: final crown in place. 9 – 2.5 year follow-up shows stable soft-tissue conditions.
CLINICAL CASE
1 – Pre-operative view of the atrophied ridge. 2 – Application of a 1:1 mixture of autologous bone and Geistlich Bio-Oss®.3 – Geistlich Bio-Gide® is tightly fixed and pinned, thus immobilizing the particulate graft. The sausage-like augmentation allows extended horizontal augmentation. 4 – Primary wound closure is obtained with a combination of mattress and single-interrupted sutures.5 – Sufficient amount of augmented bone for implant placement 8 months after augmentation. Implants are placed in a submerged procedure. 6 – Insufficient vestibular depth and keratinized tissue after alveolar ridge augmentation. 7 – Application of a keratinized strip towards the vestibulum and Geistlich Mucograft® over the augmented area where it is left exposed for healing. 8 – Situation before reopening for abutment connection after 3 months showing increased vestibular depth
CONCLUSIONS:
Geistlich Mucograft® with a keratinized tissue strip was utilized to increase vestibular depth and gain additional keratinized tissue.
Augmentation of severely atrophied alveolar ridge provided sufficient bone for implant placement 8 months following augmentation.
CLINICAL CASE
1 – Baseline buccal view: immediate implant placement was performed 3 months prior to replacing tooth #8. 2 – Baseline occlusal view: soft-tissue deficiency on the buccal aspect. 3 – Placement of Geistlich Fibro-Gide® with minimal envelope flap and inserting a temporary crown. 4 – Stabilization of Geistlich Fibro-Gide® to the buccal mucosa using internal mattress sutures.5 – 2-week follow-up at suture removal.6 – 4 weeks post-surgery: uneventful wound healing and an increase in soft-tissue volume. 7 – Occlusal view 11 months post-surgery: there is a clear substantial increase in the soft-tissue thickness.8 – Buccal view 11 months post-surgery: a substantial increase in soft-tissue thickness is evident.9 – Buccal view 2 years post-surgery.
CLINICAL CASE
1 – Thin mucosal tissue over implant #7 creating an unesthetic appearance.2 – Occlusal view of #7 reveals buccal soft-tissue defects.3 – Augmentation of the soft-tissue on two implant sites, #7 and #10, using a conventional full thickness flap with vertical releasing incisions on site #7 and an envelope flap on site #10.4 – Geistlich Fibro-Gide® is split into two 3mm thick matrices to be used in both sites, hydrated with sterile saline and trimmed to the defect dimensions.5 – Geistlich Fibro-Gide® is secured to the periosteum apically and the interproximal papillae with 5-0 chromic gut sutures.6 – Passive closure of the flap achieved with 6-0 vicryl sutures.7 – 1 week post-surgery reveals uneventful healing with maintenance of tissue volume.8 – Buccal view at 8 weeks reveals uneventful healing with maintenance of tissue volume.9 – Occlusal view at 8 weeks post-surgery.
CLINICAL CASE
1 – Initial Clinical Situation, Occlusal/Buccal Shots of Missing teeth #12 and 13.2 – Intra-Operative, Implant Placement of #12 and 13.3 – Intra-Operative, Placement of Geistlich Fibro-Gide® in the Buccal Concavity of #12 and 13.4 – Immediate Post-Operative Buccal Soft Tissue Thickness.5 – Two Months Post-Operative Healing with Provisional Restorations.
CLINICAL CASE
Implant placement planned for site #3 and #5 with soft-tissue treatment utilizing a CTG and for sites #10, #12 and #13 with soft-tissue augmentation using Geistlich Fibro-Gide®2 – Uncovering of site #10 shows a narrow ridge width and an insufficient amount of soft-tissue thickness.3 – Tooth #10 was extracted and immediately replaced by an implant.4 – Fill the gap procedure with Geistlich Bio-Oss Collagen® to achieve contour augmentation and preserve horizontal ridge dimensions.5 – Geistlich Fibro-Gide® was trimmed to half of the thickness to fit the defect and placed into sites #10, 11, 12 and 13.6 – The entire site was closed tension-free to facilitate uneventful wound healing.7 – The 3 month follow-up shows uneventful soft-tissue healing and an increase of soft-tissue thickness at the desired sites.8 – The 6 month follow-up with the final reconstruction shows that the soft-tissue thickness at the desired site is maintained over time. This contributes to an esthetic and pleasing outcome. (Restorative work by Dr. Chao-Chieh Yang, IUSD)9 – The 2 month follow-up showing a comparison of the treated sites, one with CTG (left) and one with Geistlich Fibro-Gide® (right) in the same patient. Comparable results have been achieved with both treatments, but without the need for a donor site.
7 – Immediate implant placement with the bone mixture applied was performed.
CLINICAL CASE
1 – Initial clinical situation, tooth #8 and #9 require extraction.2 – Clinical view post extraction of tooth #8 and #9.3 – Evaluation of the buccal soft-tissue thickness.4 – Trimming of Geistlich Fibro-Gide® to fit in the gap between the buccal soft-tissue and the buccal bone wall.5 – Geistlich Fibro-Gide® in place: an immediate volume increase of the buccal soft-tissues are visible.6 – Mixing of autologous bone and Geistlich Bio-Oss® particles for placement in the gaps around the implants.7 – Immediate implant placement with the bone mixture applied was performed.8 – Provisional restoration at time of surgery (occlusal view).9 – Provisional restoration at time of surgery (frontal view).
VIDEO
Introducing the first xenogenic / allogenic validated bone substitute1